 Kawasaki Z1000SX - Service manual > Engine Sprocket Cover Removal
Final Drive / Sprocket, Coupling / Engine Sprocket Cover Removal
- Remove:
Right Lower Fairing (see Lower Fairing Removal in the Frame chapter)
Engine Sprocket Inner Cover Bolts [A]
Engine Sprocket Inner and Outer Cover [B]

- Remove the engine sprocket outer cover screws [A] to sparate the outer and inner cover [B].

- Remove the speed sensor bolt [A].

Engine Sproket Cover Installation
- Be sure to install the drive chain guide [A].
- Tighten:
Torque - Drive Chain Guide Bolts [B]: 9.8 N*m (1.0 kgf*m, 87 in*lb)

- Apply a non-parmanent locking agent to the thread of the speed senor mounting bolt.
- Tighten:
Torque - Speed Sensor Mounting Bolt: 6.9 N*m (0.70 kgf*m, 61 in*lb) - Install the engine sprocket outer cover to the inner cover.
- Be sure to install the dowel pins [A].
- Install the engine sprocket inner cover.

Engine Sprocket Removal
- Remove:
Left Lower Fairing (see Lower Fairing Removal in the Frame chapter)
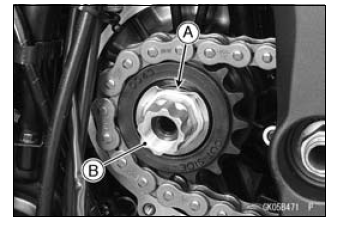
Engine Sprocket Cover (see Engine Sprocket Cover Removal) - Flatten out the bended washer [A].
- Remove the engine sprocket nut [B] and washer.

NOTE
- When loosening the engine sprocket nut, hold the rear brake on.
- Raise the rear wheel off the ground with the stand.
- Loosen the drive chain (see Drive Chain Slack Adjustment in the Periodic Maintenance chapter).
- Remove the drive chain from the rear sprocket toward the right.
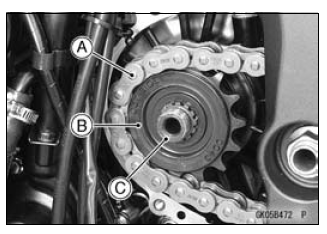
- Disengage the drive chain [A] from the engine sprocket [B].
- Pull the engine sprocket off the output shaft [C].

See also:
 Kawasaki Z1000SX - Service manual > Engine Sprocket Installation
Replace the sprocket washer. Install the engine sprocket so that "OUT SIDE" letters [A] face outward. Apply molybdenum disulfide oil solution to the threads and the seating surface of the engine sprocket nut. Tighten: Torque - Engine Sprocket Nut: 125 N*m (12.7 kgf*m, 92.2 ft*lb)
 Rider's Manual BMW R 1250 GS GSA
 Owner's Manual Harley-Davidson Sportster XL1200X Forty-Eight
 Owner's Manual Honda CBR650R
 Service manual Honda CBR650
 Owner's Manual Honda PCX125
 Owner's Manual Kawasaki Z1000SX
 Service manual Kawasaki Z1000SX
 Owner's Manual Lexmoto Echo
 Owner's Manual Royal Enfield Interceptor 650
 Service manual Royal Enfield Interceptor 650
 Owner's Manual Yamaha MT-07