 BMW R 1250 GS GSA - Rider's Manual > Wheels
Affect of wheel sizes on suspension control systems
The wheel sizes play a major role for the ABS and ASC suspension control systems. The diameter and width of the wheels stored in the control unit have particular significance as the basis for all necessary calculations. A change in these sizes resulting from conversion to wheels not installed as standard equipment can seriously affect the control efficiency of these systems.
The sensor rings required for wheel speed detection must also match the installed control systems and may not be replaced.
If you want to equip your motorcycle with different wheels, please contact a specialist service facility, preferably a BMW Motorrad retailer. In some cases the data stored in the control units can be adapted for the new wheel sizes.
TPC/RDC sticker
- with tire pressure monitor (TPM) OE

ATTENTION Improper tire removal
Damage to the TPC/RDC sensors
- Inform a specialist service facility or an authorized BMW Motorrad retailer on the fact that the wheel is equipped with a TPC/RDC sensor.
On motorcycles equipped with TPC/RDC, a corresponding sticker is located on the wheel rim at the position of the TPC/ RDC sensor. During a tire change it must be ensured that the TPC/RDC sensor is not damaged. Inform the BMW Motorrad retailer or the authorized workshop of the TPC/ RDC sensor.
Removing front wheel
- Make sure the ground is level and firm and place the motorcycle on its center stand.

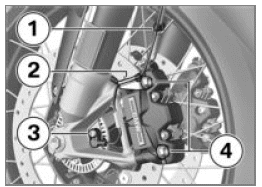
- Detach wheel speed sensor cable from the holding clips 1 and 2.
- Remove screw 3 and remove wheel speed sensor from the bore.
- Mask off areas of wheel rim that could be scratched in the process of removing the brake calipers.
ATTENTION Unintentional pressing together of brake pads
Component damage when mounting the brake caliper or when pressing the brake pads apart
- Do not actuate the brakes with the brake caliper removed.
- Remove mounting bolts 4 of the left and right brake calipers.

- Push brake pads 1 apart slightly by turning the brake caliper 2 back and forth against brake disc 3.
- Carefully pull brake calipers back and outward to remove them from brake rotors.
- Raise front of motorcycle, preferably using a BMW Motorrad front wheel stand, continuing until the wheel rotates freely.
- Mount front wheel stand.

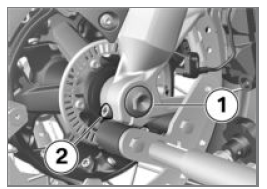
- Release the right axle clamping screw 1.

- Remove screw 1.
- Release the left axle clamping screw 2.
- Slightly press the quick-release axle inward for a better grip on the right side.

- Pull out the quick-release axle 1 while supporting the front wheel.
- Place front wheel down and roll it forward out of the front suspension.

- Remove the spacer bushing 1 from the wheel hub.
Installing the front wheel
WARNING Use of a wheel which does not comply with series specifications
Malfunctions during control interventions by ABS and ASC/DTC
- Please see the information on the effect of wheel sizes on the ABS and ASC/DTC chassis control systems at the beginning of this chapter.
ATTENTION Tightening of screwed connections with incorrect tightening torque
Damage or loosening of screwed connections
- Always have the tightening torques checked by a specialized workshop, preferably an authorized BMW Motorrad retailer.

- Insert the spacing bushing 1 on the left side in wheel hub.
ATTENTION Front wheel installation opposite the running direction
Accident hazard
- Observe running direction arrows on tire or rim.
- Roll front wheel into front suspension.

- Lift front wheel and install quick-release axle 1.
- Remove front wheel stand and firmly compress front forks. Do not actuate handbrake lever at the same time.
- Mount front wheel stand.

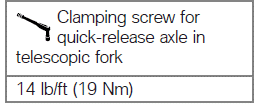
- Install screw 1 with specified torque. Brace quick-release axle on the right side at the same time.

- Tighten left-hand axle clamping screw 2 with appropriate torque.

- Tighten right-hand axle clamping screw 1 with appropriate torque.

- Remove front-wheel stand.
- Slide the brake calipers on the left-hand and right-had side onto the brake rotors.

- Install mounting bolts 4 on left and right with appropriate torque.

- Remove adhesive tape from wheel rim.
WARNING Brake pads do not contact the brake disc
Risk of accident due to delayed braking effect.
- Before driving off, check that the braking effect kicks in without any delay.
- Engage the brakes repeatedly, continuing until the brake pads seat against the rotors.
- Insert the wheel speed sensor cable into the holding clips 1 and 2.
- Insert the wheel speed sensor into the bore and install screw 3.


Removing rear wheel
- Make sure ground is level and firm and place motorcycle on its center stand.
- Shift into first gear.
CAUTION Hot exhaust system
Burn hazard
- Do not touch hot exhaust system.
- Let rear muffler cool down.

- Remove the screws 1 of the rear wheel while supporting the wheel.
- Roll rear wheel out toward rear.
Installing rear wheel
WARNING Use of a wheel which does not comply with series specifications
Malfunctions during control interventions by ABS and ASC/DTC
- Please see the information on the effect of wheel sizes on the ABS and ASC/DTC chassis control systems at the beginning of this chapter.
ATTENTION Tightening of screwed connections with incorrect tightening torque
Damage or loosening of screwed connections
- Always have the tightening torques checked by a specialized workshop, preferably an authorized BMW Motorrad retailer.
- Place rear wheel on rear wheel support.

WARNING Mixed installation of wheel bolts for spoked wheels and cast wheels
Accident hazard
- Use only wheel bolts with the same permitted length code numbers.
- Do not lubricate the lug bolts.
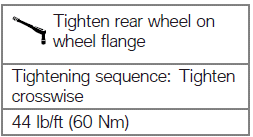
- Install the lug bolts 1 with the specified torque.

See also:
 BMW R 1250 GS GSA - Rider's Manual > Clutch
Check clutch function Pull back the clutch lever. Pressure point must be clearly perceptible. If no clear pressure point can be felt: Have the clutch checked by an authorized workshop, preferably an authorized BMW Motorrad retailer.
 BMW R 1250 GS GSA - Rider's Manual > Air filter
Replacing air cleaner insert Remove rider's seat. Open lid 1 of storage compartment. Remove screws 2, 3 and 4. Take off tank cover. Remove screws 1. Take off air filter housing lid. Remove frame 1. Remove air filter element 2. Remove frame 1 and air filter element 2. Insert new air filter element 2 and frame 1. Clean air filter element 2 or replace, if necessary. Insert air filter element 2 and frame 1. Fit air filter housing lid. Install screws 1. Place tank cover 1 in position, taking care that the guide (arrow) is underneath the upper front wheel cover 2. Install screws 1, 2 and 3. Close lid 4 of storage compartment. Install rider's seat.
 Rider's Manual BMW R 1250 GS GSA
 Owner's Manual Harley-Davidson Sportster XL1200X Forty-Eight
 Owner's Manual Honda CBR650R
 Service manual Honda CBR650
 Owner's Manual Honda PCX125
 Owner's Manual Kawasaki Z1000SX
 Service manual Kawasaki Z1000SX
 Owner's Manual Lexmoto Echo
 Owner's Manual Royal Enfield Interceptor 650
 Service manual Royal Enfield Interceptor 650
 Owner's Manual Yamaha MT-07