 Royal Enfield Interceptor 650 - Service manual > Preparation (Front/Rear Disc Brake)
Brakes and ABS / Preparation (Front/Rear Disc Brake)
Preparation (Front Disc Brake)
- Use a Philips screwdriver to loosen and remove the screws of the front disc brake master cylinder.
- Remove the cap, and Diaphragm Plate with diaphragm.
- Remove the dust cap and place the suitable ring spanner on the bleeding nipple and attach a Vinyl Pipe ( transparent).
- Thereafter, take a Clean glass / Plastic container (transparent) with fresh brake fluid, and dip the other end of the vinyl pipe (transparent) in it (make sure that the vinyl pipe is always submerged in the fluid during the bleeding process).

- Connect the DOL tool switch "ON" the ignition.

Procedure
- Select - F1 Diagnosis.

- Select - Royal D1.

- Select - Bosch ABS.

- Default Screen.

- Press C.

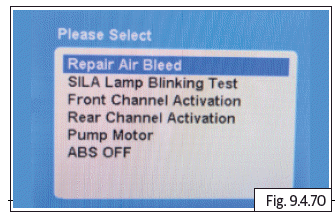
- Select - Spl Function.

- Select - Repair Air Bleed.

- Default Screen.

- Default Screen.

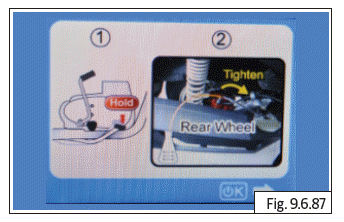
- Loosen the bleeder nipple.

- Operate the brake lever.

- Hold the lever in pressed condition and tighten the bleeder nipple.

- Loosen the bleeder nipple - (Brake lever in released condition ).

- Operate the brake lever till the next window open in DOL.

- Hold the brake lever in pressed condition and tighten the bleeding nipple.

- During this operation pump will run and expel the air trapped in the system through bleeder nipple.
Reassembly
- Switch OFF the ignition.
- Disconnect the DOL Tool.
- Remove the vinyl pipe and remove the ring spanner.
- Refit the dust cap ( make sure that there is no leak from the bleeder nipple).
- Refit the diaphragm with diaphragm plate of the master cylinder.
- Refit the master cylinder cap taking care that the vent slot in the cap is facing rider.
Preparation (Rear Disc Brake)
- Remove the reservoir cap of the rear disc brake.
- Remove the Diaphragm Plate with diaphragm.
- Remove the dust cap and place the suitable ring spanner on the bleeding nipple.
- Attach a Vinyl Pipe ( transparent).
- Thereafter, take a Clean glass / Plastic container (transparent) with fresh brake fluid, and dip the other end of the vinyl pipe (transparent) in it (make sure that the vinyl pipe is always submerged in the fluid during the bleeding process).

- Connect the DOL tool switch on the ignition

- Loosen the bleeder nipple.

- Default Screen.

- Operate the brake lever.

- Hold the brake Pedal in pressed condition and tighten the bleeding nipple.

- Loosen the bleeder nipple - (Brake lever in released condition )

- Operate the brake lever until the next window opens in DOL.

- Hold the brake lever in pressed condition and tighten the bleeding nipple.

- During this operation pump will run and expel the air trapped in the system through bleeder nipple

Reassembly
- Switch OFF the ignition and disconnect and remove the DOL tool.
- Remove the vinyl pipe and remove the ring spanner.
- Refit the dust cap ( make sure that there is no leak from the bleeder nipple).
- Refit the diaphragm with diaphragm plate of the reservoir.
- Refit the reservoir cap.
See also:
 Royal Enfield Interceptor 650 - Service manual > Anti-lock Braking System (ABS)
Working Principle The Royal Enfield Continental GT 650 twin and Interceptor 650 twin motorcycles are equipped with the state of the art Anti-Lock Braking System (ABS).
 Royal Enfield Interceptor 650 - Service manual > Brake Bleeding
CAUTION Ensure the motorcycle is upright on a firm and flat surface. Support motorcycle with suitable equipment below cradle frame.
 Rider's Manual BMW R 1250 GS GSA
 Owner's Manual Harley-Davidson Sportster XL1200X Forty-Eight
 Owner's Manual Honda CBR650R
 Service manual Honda CBR650
 Owner's Manual Honda PCX125
 Owner's Manual Kawasaki Z1000SX
 Service manual Kawasaki Z1000SX
 Owner's Manual Lexmoto Echo
 Owner's Manual Royal Enfield Interceptor 650
 Service manual Royal Enfield Interceptor 650
 Owner's Manual Yamaha MT-07