 Kawasaki Z1000SX - Service manual > Alternator Cover Removal
Electrical System / Charging System / Alternator Cover Removal
- Remove:
Left Lower Fairing (see Lower Fairing Removal in the Frame chapter) - Support the fuel tank with a suitable bar (see Fuel Tank Removal in the Fuel System (DFI) chapter).
- Pull up the connector bracket [A].
- Remove the alternator lead connector [B] from the bracket.
- Disconnect the alternator lead connector.

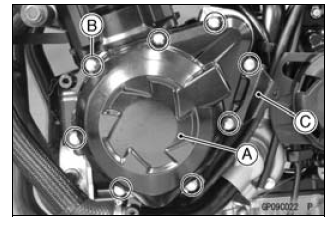
- Place a suitable container under the alternator cover [A].
- Remove:
Alternator Cover Bolts [B]
Bracket [C]
Alternator Cover

Alternator Cover Installation
- Apply silicone sealant to the alternator lead grommet and crankcase
halves mating surface [A] on the front and rear sides of the cover mount.
Sealant - Liquid Gasket, TB1211F: 92104-0004
- Check that dowel pins [B] are in place on the crankcase.
- Install a new gasket and the alternator cover.
- Tighten:
Torque - Alternator Cover Bolts: 12 N*m (1.2 kgf*m, 106 in*lb)

- Run the alternator lead correctly (see Cable, Wire, and Hose Routing section in the Appendix chapter).
- Confirm that the drain hose and clamp are installed securely and run the hose correctly (see Cable, Wire, and Hose Routing section in the Appendix chapter).
Stator Coil Removal
- Remove:
Alternator Cover (see Alternator Cover Removal)
Holding Plate Bolt [A] and Plate
Alternator Lead Grommet [B]
Stator Coil Bolts [C] - Remove the stator coil [D] from the alternator cover.

See also:
 Kawasaki Z1000SX - Service manual > Stator Coil Installation
Apply a non-permanent locking agent to the threads of the stator coil bolts and tighten them. Torque - Stator Coil Bolts: 12 N*m (1.2 kgf*m, 106 in*lb) Secure the alternator lead with a holding plate. Apply a non-permanent locking agent to the threads of the plate bolt and tighten it.
 Rider's Manual BMW R 1250 GS GSA
 Owner's Manual Harley-Davidson Sportster XL1200X Forty-Eight
 Owner's Manual Honda CBR650R
 Service manual Honda CBR650
 Owner's Manual Honda PCX125
 Owner's Manual Kawasaki Z1000SX
 Service manual Kawasaki Z1000SX
 Owner's Manual Lexmoto Echo
 Owner's Manual Royal Enfield Interceptor 650
 Service manual Royal Enfield Interceptor 650
 Owner's Manual Yamaha MT-07